
Preventive Maintenance for SKF-Interchange Bearings: Installation, Lubrication and Monitoring Guide
Product quality is rarely what kills a bearing early. The way it was mounted, greased, and watched is what does the damage.
Service life for an interchange bearing rests on three pillars: mounting precision, lubrication control, and condition monitoring. Neglect any one of them and even a well-made part will fail months before its calculated rating life.
Picture a maintenance crew inside a conveyor gallery at a cement plant in the Eastern Province, hammering a cylindrical roller bearing onto its shaft. The inner ring went on crooked, the cage bent slightly, and whatever internal clearance the part started with was gone before the drive ever turned. It was pulled again weeks later, and the plant pointed the finger at the supplier. The brinelling marks on the raceway told a different story. That scene plays out at industrial sites all over the world, and it explains most of the distrust buyers carry toward interchange bearings.
What follows is the maintenance discipline that lets SKF-interchange bearings reach the hours they were rated for.
- Why Do Interchange Bearings Die Early?
- Which Mounting Steps Decide the Outcome?
- How Should Grease Be Managed?
- Which Monitoring Habits Catch Trouble Early?
- Replace or Refurbish: Which Way?
- Conclusion
Why Do Interchange Bearings Die Early?
Almost every early failure starts at the bench rather than at the plant that made the part. A mounting error, a lubrication mistake, or dirt finding a way in accounts for the great majority of them.
Root cause studies across the industry keep reaching the same verdict: handling and maintenance practice explain most damage. Drive a bearing on with a hammer, over-pack the housing, or leave a seal lip facing abrasive dust, and the part is being destroyed long before fatigue would ever have claimed it.
Three modes dominate in the field:
- Mounting damage. An impact on the rolling elements or the cage distorts internal geometry. Clearance drifts from the designed C3 or CN figure toward zero, and the part runs hot straightaway.
- Lubrication error. Too much grease churns, lifts temperature, and eventually breaks the thickener down. Too little starves the contact zones and speeds wear.
- Contamination ingress. Dust, moisture, or process grit gets past a damaged seal and works like lapping compound inside the raceway, polishing metal away long before fatigue spalling would show up naturally.
At a mining site I visited in the Middle East, vibrating screen bearings were being changed on a cycle that shrank each time, from a planned overhaul slot to emergency swaps at a few weeks' notice. Opening the failed units showed seals packed with fine silica dust and raceways carrying the etched, polished look of three-body abrasion. Dimensionally nothing was wrong with the bearing. Nobody had kept the environment out.
Spotting those modes is step one. Repairing the mounting process is step two.
Which Mounting Steps Decide the Outcome?
Heat-based mounting, done with control and followed by a clearance check, is what bearing life stands on. Brute force is the quickest way to ruin an interchange part.
Interchange units are built to the same dimensional standards as the originals they replace, so the mounting principles carry straight across. What changes is whether a crew applies the same procedural care to them.
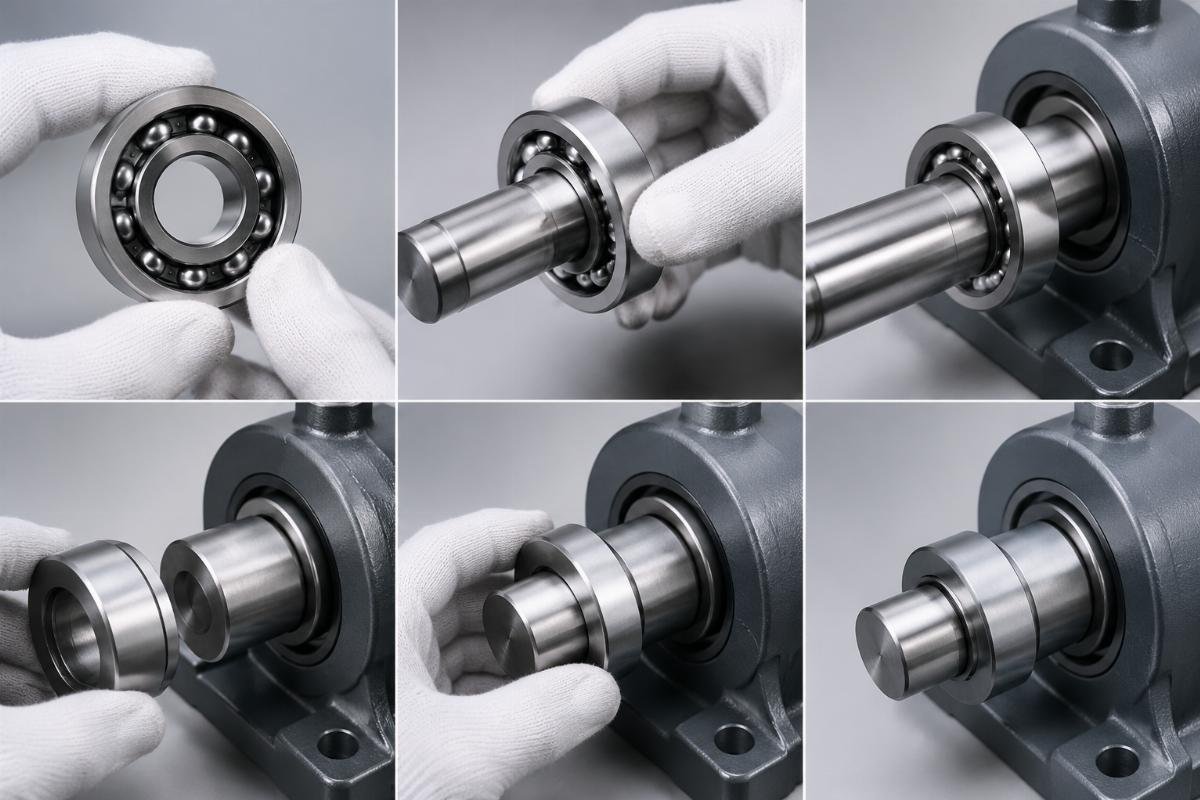
Work through this sequence on every job:
- Check shaft and housing geometry. Take journal diameter, bore size, and shoulder squareness, then confirm the fits suit the bearing's tolerance class, usually j6 or k6 on a shaft and H7 in a housing for general industrial work.
- Clean all components thoroughly. Burrs, caked grease, and loose particles all have to go, and a lint-free wipe with solvent is the minimum rather than the goal. Grit left on a shaft is pressed into the bore during assembly.
- Heat the inner ring on an induction heater or in an oil bath. Bring the part up to a controlled temperature that gives enough expansion for slip-fit assembly, and stay below the maker's ceiling, typically around 110–120 °C for standard steel-cage bearings. Open designs can take heat; sealed or pre-greased units must stay within the grease's thermal limit.
- Drive it with a sleeve that touches only the ring under load. When an inner ring goes onto a shaft, all the force must pass through that ring alone; routing it through the rolling elements is precisely what left those brinelling marks at the cement plant.
- Check internal clearance once the assembly has cooled. Slip a feeler gauge into the unloaded zone on a roller bearing, or read end-play axially with a dial gauge, and confirm the result sits inside the group the design calls for, C3, CN, or C4.
- Let the assembly cool on its own. Quenching with water or an air line shocks the steel and can distort a ring.
A South American mill once returned a whole batch of tapered roller bearings as out of spec. The lab found every unit inside tolerance. What had actually happened was in the fitting bay: outer rings were being pressed in with a drift that rested on the cage, so the cage distorted, the rollers went out of true, and the assemblies locked up while running in. The bearings were fine. The tooling was not.
Every compatible replacement bearing we ship for SKF-series interchange applications, fast movers such as 6205, 6206, 22320, and 32218 included, arrives with ISO 9001 certified documentation and mounting guidance written around the application. The paperwork is not there for decoration. It is the procedural baseline a fitter should be working to.
How Should Grease Be Managed?
Quantity and interval matter far more than how often somebody walks past with a grease gun. Over-lubrication remains one of the commonest causes of bearing overheating, and one of the least understood.
The old floor myth says more grease means more protection, and the truth runs the other way. Overfill a housing and the surplus has nowhere to escape. It gets churned by the rolling elements, friction climbs, temperature rises, the grease oxidizes and hardens, and eventually it lubricates nothing.
Work to this discipline instead:
- Calculate the fill volume. Most industrial housings want roughly 30–50% of the free volume taken up by grease, leaving the rest as room to expand. Speed, bearing type, and running temperature set the exact ratio, so check the lubrication tables for the model in hand.
- Match the product to the duty. Hot duty needs a high dropping point and resistance to oxidation; wet or washdown duty needs water resistance and anti-corrosion additives. A general-purpose lithium grease in a kiln is a short route to an early failure.
- Base the regreasing interval on running hours rather than the calendar. A bearing held at elevated temperature around the clock consumes grease faster than one on intermittent duty. Work out the quantity from the bearing's geometry and speed, since the standard formula uses outside diameter, width, and rotational speed.
- Take the old charge out through the relief plug rather than past the seal. Crack the relief port open before injecting; pushing spent grease by the seal scores the lip and opens a path for dirt.
Operators at a petrochemical pump station had been greasing motor bearings every week on the calendar, whatever the running hours, and the housings were packed solid. Temperatures ran well past ambient, hot enough to brown the paint on the end cap. Once the volume came down to the calculated figure and the interval was stretched to match real running hours, temperatures returned to normal and the bearings made their expected service interval.
Our range, from deep groove ball bearings through self-aligning roller bearings, comes with data sheets on lubrication matched to the type and to normal operating conditions. Charts that map grease compatibility across SKF, NSK, FAG, and other major makes come with it, so a team moving from an OEM number to an interchange equivalent can check before the first shot.
Which Monitoring Habits Catch Trouble Early?
Bearings rarely fail with no warning at all. Temperature climbs, vibration shifts, and the sound of the machine changes, provided a baseline exists to compare against.
This is where preventive work separates from reactive repair. The object is not to catch a part at the moment it seizes but to notice the first micro-pitting, incipient spalling, or grease starting to break down, and book the swap into a planned shutdown.
Three parameters carry the monitoring program:
- Temperature. Take a baseline during the first week after installation. A sustained rise above ambient past a set threshold is a dependable sign of a lubrication problem, too much preload, or internal damage beginning. Follow the trend; a slow climb over weeks carries more information than one reading.
- Vibration. Overall velocity (mm/s RMS) gives a broad health picture. Where rolling elements are involved, enveloped acceleration (gE) or spike energy reacts earlier to rolling contact fatigue. Capture baseline spectra while the part is new and compare later readings against them.
- Acoustic emission and visual inspection. On walk-down rounds, listen for anything irregular; a steady hum is normal, while rhythmic clicking or grinding points at rolling element or raceway damage. Add a grease sample check, since grease that has darkened, hardened, or picked up metal flecks is a direct sign of internal wear.
A generation plant in Southeast Asia ran its forced-draft fan bearings until they broke, with nothing checked in between. Monthly vibration trending plus temperature logging recorded around the clock let the crew spot an inner ring defect while it was still developing, and the swap happened in a planned outage, at a fraction of what a breakdown costs in parts and lost output.
None of it demands an expensive online system on day one. A vibration pen and an infrared heat gun, used on a routine and recorded properly, will catch most developing problems long before they stop production.
Replace or Refurbish: Which Way?
The decision is economic. Bearing size, damage type, and what an unplanned stop costs all weigh against the price of a new unit.
Not every worn part belongs in the scrap bin. Big spherical rollers, tapered units out of heavy gearboxes, and expensive application-specific designs can often be returned to dependable service, provided the damage has not gone deeper than the raceway surface layer.
The framework is straightforward:
- Replace immediately where there is through-hardening micro-cracking, a fractured cage, severe corrosion pitting, or distortion of the rings. Re-grinding and re-rolling cannot undo any of those.
- Consider refurbishment where damage stops at superficial raceway wear, light smearing, or controlled spalling confined to one ring. Grind the raceway, fit fresh rolling elements and a cage, certify the assembly back to original tolerance, and it can go back into service for a fraction of replacement cost.
- Always put a number on downtime. A deep groove ball bearing worth a few dollars never justifies refurbishment, while a big spherical roller in a kiln or crusher, where one failure could stop a line for days, may justify a professionally restored unit, or, more often, holding a ready replacement on the shelf.
MRO buyers and distributors should carry the right mix: fast-turnover standard sizes such as 6205, 6305, NU205, and 22308 as new units ready to dispatch, while working through the refurbishment arithmetic on the larger, slower-moving sizes.
Conclusion
The hands that mount and maintain a bearing write its service life, not the factory alone.
Mounting precision removes damage no quantity of grease can undo. Disciplined lubrication holds off the thermal and chemical decay that ruins grease and steel alike. Consistent monitoring turns a surprise breakdown into a scheduled change. Apply all three without exception and SKF-interchange bearings deliver the rating life they were built for, and the suspicion that premature failures create simply fades.
Need a quote for a specific bearing designation? Our engineers reply within one business day.
Request a quote